Categories
features tips & tricks

Maximum Effort! How To Play Deadpool

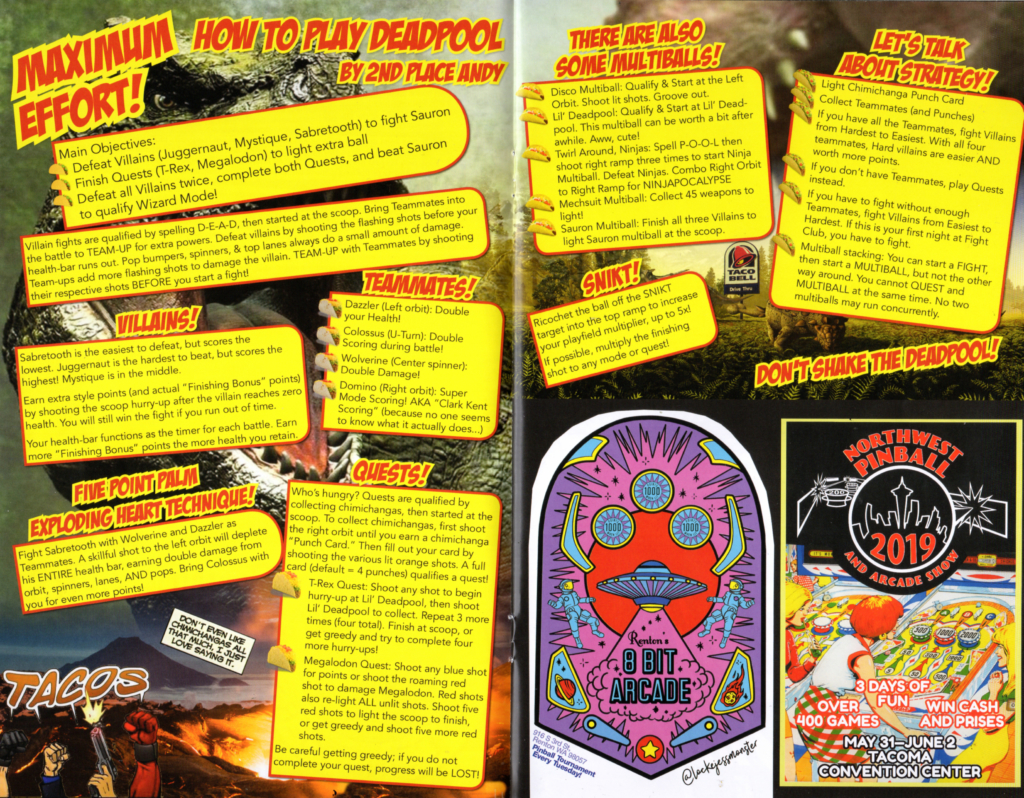
How to Play DEADPOOL – by 2nd Place Andy

Originally published in Skill Shot 53, January 2019

Main Objectives:

  1. Defeat Villains (Juggernaut, Mystique, Sabretooth) to fight Sauron.
  2. Finish Quests (T-Rex, Megalodon) to light extra ball.
  3. Defeat all Villains twice, complete both Quests, and beat Sauron to qualify Wizard Mode!

Villain fights are qualified by spelling D-E-A-D, then started at the scoop. Bring Teammates into the battle to TEAM-UP for extra powers. Defeat villains by shooting the flashing shots before your health-bar runs out. Pop bumpers, spinners, & top lanes always do a small amount of damage. Team-ups add more flashing shots to damage the villain. TEAM-UP with Teammates by shooting their respective shots BEFORE you start a fight!

Teammates!

  • Dazzler (Left orbit): Double your Health!
  • Colossus (U-Turn): Double Scoring during battle!
  • Wolverine (Center spinner): Double Damage!
  • Domino (Right orbit): Super Mode Scoring! AKA “Clark Kent Scoring” (because no one seems to know what it actually does…)

Villains! Sabretooth is the easiest to defeat, but scores the lowest. Juggernaut is the hardest to beat, but scores the highest! Mystique is in the middle.

Earn extra style points (and actual “Finishing Bonus” points) by shooting the scoop hurry-up after the villain reaches zero health. You will still win the fight if you run out of time.

Your health-bar functions as the timer for each battle. Earn more “Finishing Bonus” points the more health you retain.

Five Point Palm Exploding Heart Technique– fight Sabretooth with Wolverine and Dazzler as Teammates. A skillful shot to the left orbit will deplete his ENTIRE health bar, earning double damage from orbit, spinners, lanes, AND pops. Bring Colossus with you for even more points!

Quests! – Who’s hungry? Quests are qualified by collecting chimichangas, then started at the scoop. To collect chimichangas, first shoot the right orbit until you earn a chimichanga “Punch Card.” Then fill out your card by shooting the various lit orange shots. A full card (default = 4 punches) qualifies a quest!

  • T-Rex Quest: Shoot any shot to begin hurry-up at Lil’ Deadpool, then shoot Lil’ Deadpool to collect. Repeat 3 more times (four total). Finish at scoop, or get greedy and try to complete four more hurry-ups!
  • Megalodon Quest: Shoot any blue shot for points or shoot the roaming red shot to damage Megalodon. Red shots also re-light ALL unlit shots. Shoot five red shots to light the scoop to finish, or get greedy and shoot five more red shots.

Be careful getting greedy; if you do not complete your quest, progress will be LOST!

There are also some Multiballs!

Disco Multiball- Qualify & Start at the Left Orbit. Shoot lit shots. Groove out.

Lil’ Deadpool- Qualify & Start at Lil’ Deadpool. This multiball can be worth a bit after awhile. Aww, cute!

Twirl Around, Ninjas- Spell P-O-O-L then shoot right ramp three times to start Ninja Multiball. Defeat Ninjas. Combo Right Orbit to Right Ramp for NINJAPOCALYPSE

Mechsuit Multiball- Coming Soon! Keep stockpiling your weapons.

Sauron Multiball- Finish all three Villains to light Sauron multiball at the scoop.

Let’s talk about strategy!

  1. Light Chimichanga Punch Card
  2. Collect Teammates (and Punches)
  3. If you have all the Teammates, fight Villains from Hardest to Easiest. With all four teammates, Hard villains are easier AND worth more points.
  4. If you don’t have Teammates, play Quests instead.
  5. If you have to fight without enough Teammates, fight Villains from Easiest to Hardest. If this is your first night at Fight Club, you have to fight.
  6. Multiball stacking. You can start a FIGHT, then start a MULTIBALL, but not the other way around. You cannot QUEST and MULTIBALL at the same time. No two multiballs may run concurrently.

SNIKT!

Ricochet the ball off the SNIKT target into the top ramp to increase your playfield multiplier, up to 5x!

If possible, multiply the finishing shot to any mode or quest!

Don’t shake the Deadpool!

Categories
features tips & tricks

Three Things You Should Know About Ghostbusters

Three Things You Should Know About Ghostbusters
By Second Place Andy

Easy Multiball
Hit the left captive ball twice (on any ball in play) to instantly light all three locks for Storage Facility Multiball. Lock three balls at the left ramp to start Multiball.

Instant Video Mode
Use the right flipper to select a blue arrow skill shot before plunging. The far right scoop awards Video Mode when hit first. Plunge the ball hard, do not flip, and see if the ball bounces off the flipper into the scoop for a neat “hands free” shot! Practice “Don’t Cross the Streams” video mode for an easy 20-50 million points. This can be repeated every ball unless a mode is carried over from a previous ball.

6x Playfield
Use the left flipper to select a yellow lane skill shot before plunging, noting the lane choice freezes after the ball is in motion. The “K” is usually lit for “Light Multipliers,” qualifying the 2x and 3x stand-up targets on the left ramp. The 2x and 3x targets each add time and together make 6x playfield scoring, yielding incredibly lucrative modes and multiballs.

Originally published in Skill Shot issue 52

Categories
features tips & tricks

Hello World, I’m your ch-ch-ch-Cherry Bomb!

Hello World, I’m your ch-ch-ch-Cherry Bomb!

A balanced strategy on Guardians of the Galaxy of modes and Multiballs.

by 2nd Place Andy

GotG features 8 standard (timed) modes and 2 main Multiballs. In most cases, you can start a mode and then start a Multiball, thus stacking the features of each. However, if you select your modes carefully, you can use your mode shots to make progress towards your next Multiball, achieving both objectives faster! What you really should be aiming for, however, is mode completions. When you start a mode, the mode title will blink. If you complete the required objectives before your timer runs out, the mode title will light solid for the rest of your game. Completing any four modes lights Cherry Bomb Multiball which is fun to play and worth a lot of points! Did your time run out before you completed your mode? You can always re-start it at the scoop, continuing where you left off before, but with a fresh timer.

Start your game with the mode Yaka Arrow. This mode awards progress for every entry to the pop bumpers as well as the lower left intake shot (“Yondu”), which you will have to hit at least once. You’ll get credit for 1 pop bumper shot right off the plunge! Then, focus on Groot and try to lock balls in Groot’s mouth. Each time you lock a ball, the new one launches into the pops and you get free credit! Hopefully by the time you play Groot Multiball, you will have achieved completion on Yaka Arrow.

Next on deck is the mode Antiquities Shop. This mode awards progress for every hit to the ORB shot. Bang away at that ORB until your ORB Multiball is ready and play through the Multiball. Hopefully by the time you’re done with ORB Multiball, you’ll have completed Sanctuary.

Two down, two more to go before Cherry Bomb Multiball. Plus you’ve already played Groot and ORB so you should have a competitive game going on by now.

I’ll go over the objectives of the remainder of the modes and you can decide for yourself which two you’ll have the easiest time completing! (Hint: I usually choose Pod Chase + Sibling Rivalry)

Quill’s Quest – This is a two-ball Multiball with repeated hurry-up shots. You can always shoot the scoop for an award. If you fail to complete all the hurry-ups in the allotted time, and subsequently restart the mode, it will play as a single-ball mode instead. Also note this mode disables any progress towards ORB Multiball.

Escape Klyn – This mode awards progress by completing the rollover lanes (2 at the top, 2 on the bottom left, and 1 on the bottom right). Additionally, you will need to hit Groot and finally Rocket to complete the mode. Normally the rollover lanes light a Shot Multiplier, but this feature is disabled during the mode. However, upon completion, one Shot Multiplier will be awarded. Remember that you always have access to the lanes- the orbits feed the top lanes, the right ramp feeds the lower right lane, and the left ramp feeds the lower left lanes.

Pod Chase – This mode awards progress on the ramps. Easy enough.

Sibling Rivalry – This mode awards progress for combos. Note that repeatedly shooting ramps also qualifies as progress for this mode, making it a great followup to Pod Chase.

Knowhere – This mode awards progress on the orbits. Got it?

Sanctuary – This mode awards progress on the stand-up targets. These shots are typically dangerous. However, the left orbit is always lit to spot a target. If you can dial it in, you will be able to complete both Knowhere and Sanctuary by simply repeatedly shooting the left orbit!

Okay great, so now you’ve got four modes completed! Shoot the scoop to start Cherry Bomb Multiball! Everything is lit for 60 seconds; Multiball starts and continues with unlimited ball save and autoplunger; shoot all major shots to light the Super Jackpot for big points! Don’t forget you can use your Hadron Enforcer (the button on the lockdown bar) to spot a shot that’s giving you difficulty. Enforced!

Still want more?
Play all 8 modes, making a minimum amount of progress on each (roughly halfway to completion), and both multiballs, to qualify Immolation Initiative!
Complete all 8 modes, and “complete” both multiballs (roughly speaking, earn a Super Jackpot) to qualify Save Xandar!
High Score!

Originally published in Skill Shot issue 51

Categories
features tips & tricks

First of All

First of All

By Sagel Frazer

The first thing I learned about competitive pinball was to go last if I could and it was bullshit. This is a fairly incoherent and unstructured rambling about why. It applies primarily to matches between two players as that is what people in the Seattle area are most likely to encounter in weekly tournaments. I’ll probably get distracted. I’ll probably end up talking about something else. But first, start going first.

The pressure in a pinball match used to start for me before the game even began. I had to worry about winning a coin toss because going second is supposedly valuable. Don’t get me wrong, it is – if you’re extremely good, have mastered playing under pressure, know a variety of scoring strategies for the game you’re playing, and have actually practiced achieving specific point objectives. The reality for most of us is that we practice pinball by accident. We play by ourselves or casually with friends and with no more of an objective than to do well and not to drain. We aren’t concerned overmuch with any score but our own. The only time this can happen in competitive play without a lot of mental gymnastics is going first. I used to worry about winning a coin toss. Now I really don’t care. I get to go first almost all the time and I get to play the only ball of the match in which another person isn’t involved.

The most unfortunate thing about competitive pinball is that as often as the outcome is the result of playing well, it is just as regularly due to the competition playing poorly. I don’t know how many matches I’ve won in part because the other player was convinced I was going to win, but I’m pretty sure it’s substantial. I know the look on somebody’s face right before they make themselves lose, I’ve made it myself enough times. That being said, encourage your opponent to win for you. Picking to go first throws a lot of people off. I’ve had people try and talk me out of it or automatically attempt to start the game when they lose the coin toss. Go into a match with the expectation you are going to win. People are intimidated by confidence. And before anybody gets uppity, I’m not advocating actively trying to make an opponent play poorly, but there’s nothing wrong with being aware of the impact your choices can have and benefitting from them. Finally, opening a game with a good ball is the single greatest advantage you can have. The better you get and the more you practice going first, the more often it will happen. This is especially beneficial when playing somebody better than you. Most of the times I’ve found myself losing a match with a large skill differential in my favor are when they had a great first ball and I let it get to me. I look at going first as an opportunity to make a statement, to let the other player know what you’re capable of. If they can respond, great. If they can’t, great.

But what if you want to actually benefit from going second? Learn rule sets. A handful of games have nuances that give decisive benefit to position such as shared ball locks or progressive jackpots. Learn multiple scoring strategies which will allow you to make decisions based upon your opponent’s score. Watch ball returns during the other player’s first ball if you’re playing an unfamiliar machine. Finally, practice losing. The next time you’re playing pinball by yourself and you have a terrible first ball, set a scoring objective for your second balI – like to pick something I should be able to regularly get to and then double it. Do the same on your third ball. At some point I realized that what I was doing when I played on my own was reinforcing the idea that I would have a bad game and that I could just keep playing until I had a good one. Now every bad game I have is an opportunity to practice playing from behind. If you’re going to play second, you’re going to have to play from behind on at least one ball every game.

Categories
features tips & tricks

How to Host a Pinball Tournament

How to Host a Pinball Tournament

 By Dwayne LaMont Collins

Seattle’s pinball community is nothing short of amazing, and hosting events has been a great foundation for learning the culture of the pinball world. It has really helped me to connect with folks. People ask me why I like to host and the answer is simple: I love what I do. I love bringing people together and watching relationships flourish from the simple catalyst of a pinball match. That stranger you just beat on your third ball of Terminator 3 could become your new friendly rival.

It’s not as easy as it looks, yet it is simple. Yeah, you could host a tournament and have people play pinball, that’s cool and all, but will the players take anything from that experience? Anyone can host, but how you host is what sets your tournament apart.

First, it helps to be patient, or at least have some form of composure. Most tournaments start off without a hitch: everyone is attentive, excited, and ready to play pinball. Most of Seattle’s tournaments take place in bars, so by round four, many players are not paying as much attention. That’s not as bad as it seems. People are drinking and socializing and having a good time. Ultimately, that’s what you want at your events. You may find yourself chasing down players to get results.

Energy is a must! Pinball tournaments always go longer than expected. A good host is able to go the distance. As badly as you wanna drink with the best of them, you have to remember that you are responsible for keeping the tourney going and making sure everyone has a fun and safe time.

A good host advertises their product. Word of mouth is fine, but people feel more included when you personally invite them to your event. I ask every new person I meet through tournament play to come play at an event I’m hosting. I’ll get contact information and even go as far as sending them a friendly reminder the day before or day of. It also helps to use social media when getting the word out about your events.  A little advertising can seriously increase your turnout! Advertise!

Can you be interesting? Charisma is a necessity in the world of pinball hosting. Take a look at some of the people who run these events: Ramsey Sierra, Brad Hayden & Gordon Ornelas, Justina Russo, Sergey Posrednikov, Maureen Hendrix, Hannah Holmberg. Each one has their own style, and their own class, which is what makes their brand their own. Alexa Philbeck’s tourney won’t have the same exact vibe as Michael Warfield’s, but you know what you are getting into when you attend either’s events. If you like it, you keep coming back for more. Pinball tournaments often mirror the personality of the host.

Humor helps people enjoy the tournament just that much more. Whenever I announce, if possible, I’ll try to throw in something witty just to keep everyone awake and get a little giggle from the crowd. I have no problem poking fun at my pinball skills (or lack thereof) in front of an audience. When I don’t take myself too seriously, it helps everyone else not take themselves too seriously either. It’s pinball and it’s fun. Those are the only two things that matter. Ultimately, we are all there just to have a good time.

How does one become a successful host? Patience, Energy, Advertising, Charisma and Humor. No, I didn’t intend to make an acronym with PEACH, but hey, if it helps you become a great host…then I guess it’s a thing.

Originally published in Skill Shot 49, August 2017

Categories
features tips & tricks

Drillin Fools

Drillin’ Fools
by 2nd Place Andy

A fun way to play 2-player competitive pinball and improve your accuracy.

Pinball practice at AddaBall

In “Drillin’ Fools,” you will study all of the main shots in a game, and practice shooting each one repeatedly. Pick a “par,” and that will be the number of times to make each shot. You won’t be paying attention to the scoreboard, just counting your shots. It is good to have basic mastery of dead flips and post passing before playing this way.

Put a bunch of money in the machine and start up a 4-player game. Then simply switch players every time a ball drains. Since the score is inconsequential, keep switching even if you are awarded an extra ball. The first player to finish wins! Each player keeps track of their own progress towards the goals (your opponent can help you remember how many shots you’ve completed). If neither player has completed all the objectives, start another 4-player game and resume your progress!

AFM playfield
AFM playfield

Let’s look at Attack From Mars as an example. The main shots (clockwise) are Left Loop, Left Ramp, Lock, Saucer, Scoop, Right Ramp, and Right Orbit. Let’s say you are playing with a par of 5. Your first objective is to shoot the Left Loop five times. No other shots count towards your goal until you’ve got all five. After that, start focusing on the Left Ramp and try to hit it five times before moving onto the Lock shot. And so on, until you finish with five Right Orbits. Can you do it all in one ball? Your progress carries over from turn to turn until you finish. Depending on the difficulty of the game in question, you may want to adjust the par or the order of shots.

Want to play cooperatively? Both players follow the same set of objectives together instead of making progress separately. Don’t have a buddy to play with? This style also makes for a great game of solitaire.

Drillin’ Fools check list example

Happy Drillin’!

Originally published in Skill Shot 46


Fool (Jokerz!)

Categories
features tips & tricks

Highway to the Danger Zone

Highway to the Danger Zone 
by 2nd Place Andy
[two_third last=”no” class=”” id=””]My strategy for the Addams Family is quite narrow. Many of the shots and features of the game can be ignored. This is helpful, however, because there are fewer situations to practice or memorize. Instead, I just focus on keeping control of the ball in each of the game’s three Danger Zones.

You will repeatedly have to deal with these Danger Zones, so master them and you will exponentially improve your score.

The first Danger Zone is the Graveyard exit shot from the mini Thing flipper. This is generally accessed from the left ramp (or Bear Kicksdanger 1 during the Seance). It is tempting to shoot across to the Swamp for 5x value. However, safely feeding the left flipper is more desirable. A slight nudge here can keep the ball away from the left outlane. Try nudging right just as the ball passes by the mini flipper to guide it into the 2 Bear Kicks lane. With practice, both the Electric Chair and Bear Kick Ramp can be shot safely as the ball rolls down the left inlane. Take note that if you activate Thing Flips from the Bear Kick ramp, the mini flipper will always engage, making it impossible to feed your left flipper.

The second Danger Zone are the kickouts- Electric Chair (left) and Swamp (right). Right before a ball kicks out, the game warns players danger 2with a thunderclap sound and a flashing lightning bolt. The lightning will flash on the same side as the kickout! Hopefully, the kickouts follow the same trajectory every time. However, be prepared to adjust your strategy to compensate for machines with less consistent kickouts.

Let’s look at all the different options for stopping the ball after it comes out. You can find descriptions (and often videos) of these maneuvers online (www.ipdb.org) if you are unfamiliar. From easiest to hardest to perform: Hold Trap (I call this “hold and pray”); Dead danger 2.2Pass; Flip Trap / Live Catch; Drop Catch;  Reflex Flip (flipping the ball right as it comes to the flipper). Unless you have incredible, repeatable accuracy with this last method, I do not recommend it. However, most novice players play exclusively this way. On an ideal machine, Hold Traps and Dead Passes work 100% of the time from both kickouts. Usually a Dead Pass works on at least one side. Once you have the ball safely trapped in the cradle, you may attempt a post-pass (if possible) before shooting the next shot.

The third Danger Zone is the right inlane (such as after shooting the Bear Kick ramp).

Controlling a rolling ball is difficult! Try out: Hold Trap; Hold and Tap (flip the flipper hard right before the ball gets there, and it may stop danger 3entirely – usually more effective with a small nudge); Inlane Pass / Bop Over / Tap Pass; Inlane Loop Pass; Rolling (Live) Post-Pass; Reflex Flip (careful!); Half Volley (For games where the ball does not have enough momentum to complete a rolling pass, hold the flipper up, then release just after the ball touches the flipper, then quickly strike the ball again. This propels the ball much slower than a reflex flip, yielding a safer ricochet on missed shots); Alley Pass (“Shatzing the inlane”). I must emphasize that dialing in your Reflex Flip seems like the simplest option here, but it is also the most likely to drain. So try out everything else and see what’s the most consistent!

Try all the options! Figure out what works for you. See if you can perform a move 10 times in a row. Experiment, assess, adjust. The idea here is to navigate each Danger Zone perfectly every time. Then follow the flowchart for massive points. Good luck!

TAF flowchartOriginally published in Skill Shot 44[/two_third]
[one_third last=”yes” class=”” id=””]

Side Bar Glossary
By Kayla Greet

Hold Trap – Just as simple as keeping your flipper up to trap the ball as it rolls through the inlane or out the kickout.

Hold and Tap (sometimes called Flip Trap) – Similar to above, keep your flipper up to trap, but if there is considerable speed on the ball, give the machine a nudge or tap the flipper to dampen the velocity.

Dead Pass / Dead Flip – One of the easiest moves because it involves doing nothing at all! Keep your flipper down, let the ball bounce off the rubber and arc over to the other flipper.

Live Catch – When the ball hits your flipper, engage it to meet the ball exactly when the flipper is fully extended. This halts the ball, makes it look as if it is stuck on the flipper, and will allow you to trap it.

Drop Catch – Much like the Live Catch, you’re essentially ‘bunting’ the ball. Pull the flipper back just as the ball makes contact. This mutes the energy of the ball and then you can re-engage the flipper to trap.

Reflex Flip – “See ball, Hit ball.” Nothing fancy.

Post Pass – Start with a trapped ball. Then take the trapper flipper and give the button a half tap, which sends just enough kinetic energy to arc the ball to the other flipper, often but not always ricocheting off the above slingshot post.

Inlane Pass – This motion often involves a feed to the flippers from a ramp shot, like the Bear Kick on TAF. Hold your flipper up like a mini ramp and allow the ball to pop over to the other flipper. Sometimes it requires a bump or nudge to the front of the machine for a little extra oomph.

Bop Over – Same as Inlane Pass but with a fluttering “flick” of the flipper to give the ball extra momentum.

Flick Pass / Tap Pass – Let the ball roll to the end of the flipper and give it a tiny tap (so tiny in fact that the flipper will not appear to move) to transfer it to the other flipper. Usually works best on electromechanical (EM) games.

Inlane Loop Pass – Starts as an Inlane Pass but drop the flipper as soon as the ball makes contact. Works well on games with high speed inlanes.

Rolling Post Pass – Same as the Post Pass but with the ball in motion instead of a trap.

Alley Pass / Shatzing the Inlane – This move, made famous by California player Neil Shatz, involves the ball in a trap on a flipper and tapping the button just enough to get the ball to travel back up the inlane rollover. Great way to take advantage of a lit inlane to qualify its award, such as an Extra Ball.[/one_third]

Categories
features tips & tricks

Doctor Who Shuttle Tutorial

by ELF

This is an attempt to count the minimum number of flips it takes to reach 1 billion points using Doctor #2 (Patrick Troughton) / Sonic Boom approach. It requires only three different shots on the playfield and the least amount of live “scary” shots, keeping your ball relatively safedoctor two compared to other, riskier approaches. Assuming you make every shot, your game should go like this:

Choose Doctor #2 which adds Hang On time and doubles that score. Plunging will feed the ball to your right flipper. Shoot the far hang onleft shot (H) past the upper flipper to receive your HANG-ON award and set up the O / PLAYFIELD MULTIPLIER ramp shot from the upper flipper. Shoot the upper ramp ten times to start the Sonic Boom and activate the ball diverter to feed the ball to the lower left flipper. Now spell “WHO”  by hitting the right ramp (W), the HANG-ON shot (H), and the upper ramp (O) for 40 million per letter and a return to the upper flipper to start it all over again. Before you do, you’ve already earned 144,875,000 points! Not only that, but you’re a mere nine easy O ramps away from the next Sonic Boom. This is where your ramp-hungry zombie stamina comes into play because you will have to do this series of shots five more times.

After the 2nd COLLISION you will have 304,875,000
After the 3rd – 478,875,000
After the 4th – 654,875,000
After the 5th – 832,875,000
After the 6th – 1,010,875,000
Math!!!

This approach requires 74 flips. Sound like a lot? Don’t worry! Once you get the hang of the upper ramp, it almost becomes a comfortable or Who ramp 2safe experience, and there are only 13 live “scary” shots total to worry about before reaching our goal: six “W” shots and seven “H” shots. These can only be mastered through lots of practice. (fun practice hint! – spell WHO without starting shuttle mode and the ball will return to the lower left flipper every time, setting you up to do it again. You have to spell WHO pretty much consecutively, or at least within a few seconds per letter in order to get big money and no whammies. This is also true during who rampyour 40 million per letter Sonic Boom, so don’t miss!)

This is only one of four strategies I know of, and to be honest, actually pulling this off without missing a single shot is extremely difficult to execute. There are so many cool things to do on this amazing table, so don’t be afraid to explore other options. For an incredibly in-depth look at choosing other Doctors (or why to choose #2) and different methods of gaining ridiculous points at a higher risk of draining, refer to Bowin Kerins’s online guide. http://www.ipdb.org/rulesheets/738/drwho.htm

Originally published in Skill Shot 43_DSF0145